Make It!

Make It! Wine-Enriched Broth

Posted by on Monday Jan 20th, 2014

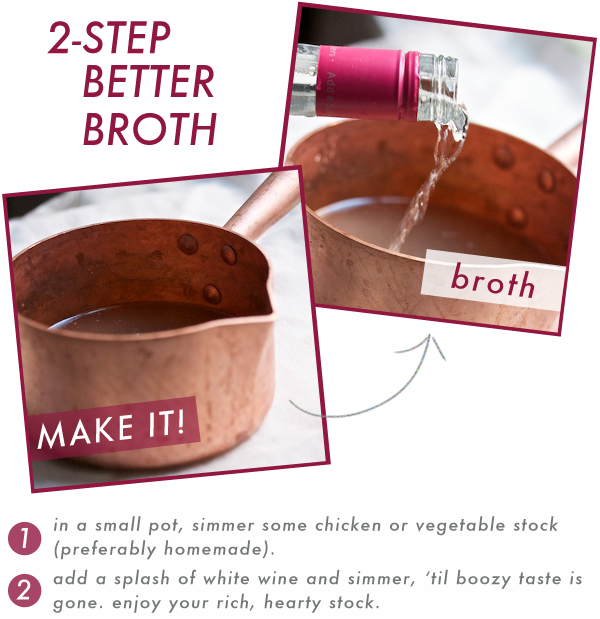
I’m a huge fan of homemade chicken and vegetable broths and hope that you guys make stock yourselves, at least sometimes. But this tip applies equally to homemade broths and supermarket stocks-it’s a way to spruce up something plain so that it stands out at dinner, perhaps in dishes like Miso-Soba Chicken Bowls or Really Good Vegetable Soup. One easy way I’ve found to turn that broth-homemade or, yes, store-bought-into something special to slurp is to pour in some wine.

As the broth simmers, the (preferably dry) white wine begins to boil off, leaving behind a toothsome, umami-rich remnant. At first, you’ll smell booze strongly, but after 10 minutes or so, you’ll be left with a broth that’s richer than when you started-without having the taste of wine at all.

From there, add whatever you love to bulk out your soup with, or enjoy a steaming bowl of plain broth that’s ultra flavorful thanks to one secret ingredient.

Make It! is a series of smart tips for prepping, making, and presenting food in the easiest possible way. See tips from previous columns, like how to bring cold eggs up to room temp–fast–and how to keep lettuce fresh in the fridge.

Make It! The Beautiful Apple Platter

Posted by on Monday Nov 4th, 2013

When I throw a brunch party, I always end up looking for an extra side dish that takes little time and space to prepare and won’t add a lot of items to my shopping list. At least in the fall and winter, I often settle on a big platter of quartered apples or pears. Easy, inexpensive, and pleasing to both light and heavy eaters, that platter of apples or pears never has a single piece of fruit remaining by the end of my brunches.

Simple as this “dish” may seem, there’s one trick to ensuring that the apple platter is a success: defeating the fruit’s propensity to brown when left out in open air.

To win against oxygen’s unappealing browning effect, simply pour some orange juice into a shallow bowl and dip each apple quarter into the juice on its way to the serving platter, coating all exposed sides. If you don’t keep a bottle of OJ in the house, pick up a few oranges and squeeze them for juice. (Sure, your apples will have a slight orange flavor, but apples and oranges taste pretty great together.)

Then simply let your platter of fruit out on the table without fear-your apples will stay bright and fresh for the duration of your party.

Make It! Oodles of Grated Parm

Posted by on Wednesday Sep 11th, 2013

It’s been a little while since I put up a Make It! post, but the last time I scrambled to cobble together enough grated Parm to make a proper Caesar dressing I found myself throwing leftover cubes from various lingering cheese wedges into the food processor and I knew I had to tell you about this shortcut. A couple of pulses later, I was in possession of enough crumbles of Parmesan to fashion my salad, and I hadn’t bloodied a single knuckle on my grater in the process.

Any time you need at least a third of a cup of grated hard cheese, whether for Artichoke Dip or Sun-Dried Tomato Pesto, I recommend putting down the grater and grinding cubes of Parmesan in your mini prep. It’s easy, and I happen to love the crumbly texture that results, which reminds me of a certain pre-grated, shelf-stable shaker of cheese-with a much more sophisticated taste, of course.

Make It! Purposely Leftover Chicken

Posted by on Monday Apr 22nd, 2013

On Sunday nights, as we clean the apartment and pay bills and get ready for Monday (and, these days, count down the minutes til Mad Men), I’ve taken on a quick cooking project that helps keep us eating healthfully and well at home all week.

I quickly roast up two chicken breasts, cool them, and store them in the fridge. Then I can make chicken sandwiches or chop chop salads, have an easy topping for greens, or make clean-out-the-fridge quesadillas that are actually good. Knowing that there’s a potential dinner in the fridge is a huge deterrent from ordering take-out. Now I realize that Sunday cooking for the week isn’t a totally original plan, but this chicken situation causes so little mess I figured I’d tell you about it in case you wanted some motivation.

The bonus is that I get to snack on the crispy chicken skin, since it won’t stay crispy for long. (Read Amateur Gourmet’s post on why you shouldn’t toss crispy chicken skin.) By the way, I use bone-in, skin-on chicken because it stays much more flavorful than boneless skinless.

Here’s all that you do: Turn the oven to 425°F. Take two bone-in, skin-on chicken breasts and place them on a foil- or parchment-lined baking sheet. Rub them with some softened butter or drizzle with olive oil, then season quite generously with salt and pepper. Bake for 3o to 35 minutes, until the skin is golden and the chicken is cooked through.

Make It! Not-Too-Tangy Vinaigrettes

Posted by on Monday Mar 11th, 2013

I’ve never been a fan of puckery vinaigrettes. But neither do I want to dress my greens in candy-sweet dressings heavy with honey or sugar.

So I figured out a way to reduce the bite without increasing the sugar-oranges.

Instead of using lemons or vinegar in your vinaigrettes, squeeze an orange instead. If you do like some tang in your dressing, you can play around with how much of the lemon juice/vinegar you replace with fresh orange juice. See the tip in action here.

How to Save Your Muffin Tins from Rust

Posted by on Monday Jan 21st, 2013

When I bake muffins, I dread cleaning the pan afterwards. It’s bad enough that batter has cooked into the crevices of each muffin cup. What’s worse is how all the little bits of grease sticks onto the unfilled muffin tins - the two extra if you’re only make 10 of the 12 cups in the pan. The residue rarely comes off the pan, try as you might to scrub.

Now I’m no neat freak, but that stickiness really annoys me-it attracts dust, and it might worm its way into a future batch of muffins. Fortunately, Alex’s mom showed me that if you fill any unused cups with water, you’ll avoid the built-up all together. Now, I fear nothing about baking muffins except how quickly they disappear from the counter.

The Best Way to Pack Homemade Goodies

Posted by on Thursday Dec 20th, 2012

Perfection. The perfect cookie, the perfect cookie container. For years, I kept every gift box and product package I thought might one day fit a cake, some cupcakes, a gift of brownies, or holiday cookies. I stowed the boxes in the Closet of Doom. Occasionally, they fell on my head. Rarely was any box a perfect fit for any sweet I was gifting.

I moved onto multi-sized pouches and containers I’d buy at cake supply and gift stores. But those too had to be piled in the Closet of Doom, and sometimes they weren’t the right size either. But I love giving sweets to friends, especially this time of year. How to transport them without hoarding little boxes?