How do I love food blogging? Let me count the ways. You have the pleasure of experimenting with new recipes, writing about your adventures in the kitchen, and of course, eating the masterpieces you have created. But what about photographing the food? You can literally end up writing a book about the food, but it’s the pictures that are truly worth a thousand words. To me, it’s the best way to capture the experience of making and enjoying the final product.
My friends often ask me what kind of camera I have when I post my food photos. You must use an expensive DSLR, right? No, not at all. In fact, I use a simple point-and-shoot camera that I’ve owned for years! An expensive DSLR isn’t warranted if you know a few tricks of the trade, which I’m happy to share after much trial and error.
**How to Photograph Food Like a Pro**
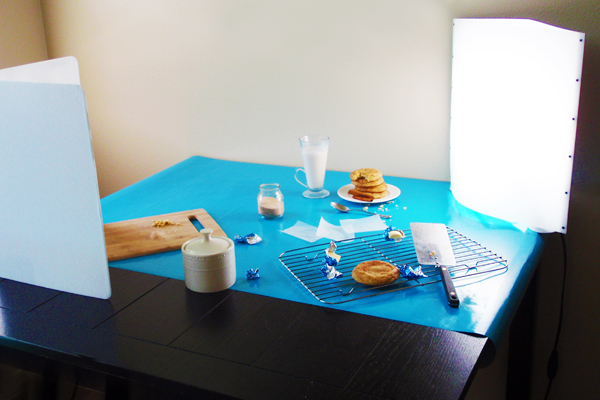
Be prepared. Before you even make the food, have everything positioned exactly where you want it in the photo. This includes (but is not limited to) the serving dish, props, lighting equipment, and tripod. The last thing you want to do is rush during a photo shoot! And remember, you will be hungry by the time you’ve finished cooking/photographing the food, so snack on something beforehand so you’re not tempted to eat your food subject.
Please don’t use flash. Every food photographer and stylist out there will tell you that lighting is more important than the food itself, and boy are they right! Try avoiding using the flash on your camera (unless you’re using it as foreground fill with other side lighting). It creates harsh, uneven lighting when used alone. It’s always best to use natural light, so take your photos near a window or outdoors. The best time of day is late morning to early afternoon, and if the photo weather gods are cooperating – bright, cloudy days provide perfect lighting conditions. If you must take your photo at night, you can create a soft, natural light ambience with the food-blogger-acclaimed Lowel EGO light. I was lucky enough to receive this truly magical light as a gift, but if it isn’t within your means, there are plenty of online tutorials for creating your own light box.
Manipulate the lighting. Lighting is everything, but you need to know how to manipulate it. If the light coming from your window is too harsh, diffuse it with parchment paper or a thin, white bed sheet. Want shadows on the right side of your food? Make sure your light source is coming from the left. For a brighter, more evenly-lit photo, use a homemade bounce board and place it directly opposite from the light source. White foam core is best, but silver or gold aluminum foil also creates a lovely effect. To create a foil bounce board, carefully crumble the foil and tape it to the foam core. This will subtly scatter the reflected light.
Steady wins the race. Tripods are obviously a must, but if they’re out of your price range, do what I do when I’m too lazy to bust mine out. I’ve successfully improvised a makeshift tripod using things like a stack of books, a jar, or my favorite – an Old Bay Seasoning canister. For extra security, look for the image stabilization function on your camera to reduce blur from accidental camera movement.
Read your camera’s manual. You can easily make your photo go from meh to wow! by understanding how to use your camera’s white balance, ISO, and macro settings. Ever become frustrated over that unintentional orange or bluish hue in your photos? This just means you need to adjust the white balance. And that nasty graininess that appears in your photos when you enlarge them up on your computer screen means you should lower your camera’s ISO setting. A high ISO is used for low-light situations, but since you should already have a properly lit setting, it’s best to use the lowest ISO possible to produce the least grainy image. My favorite camera feature of all has to be the macro setting. Usually indicated by a flower or tulip button on your camera, this setting allows you to take close-ups (and only close-ups) that keep the food in focus and the background artfully blurred (otherwise known as bokeh).
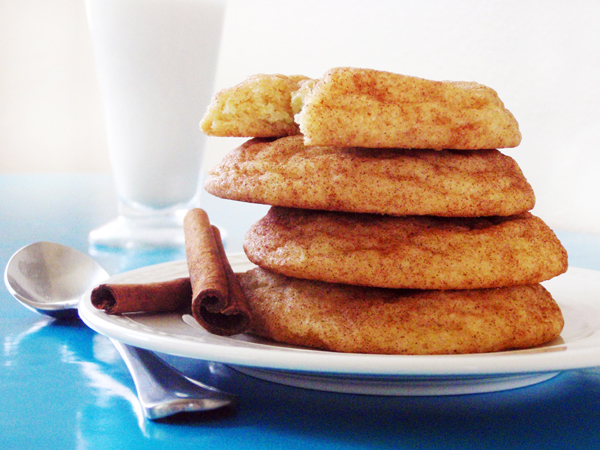
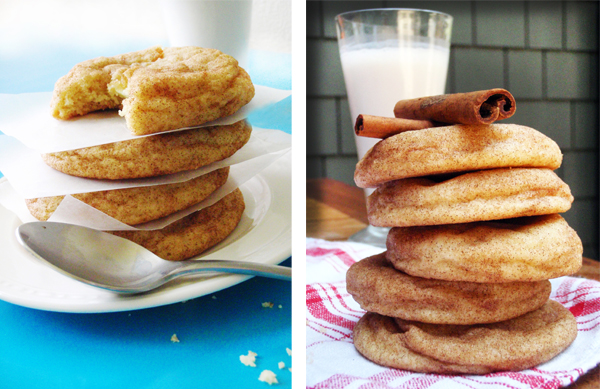
Experiment with different angles and cropping. Create interest with how you choose to capture the essence of your food. While most shots look best from a 30-degree angle, it depends on what you’re photographing. Stacked foods (like pancakes and cookies) look best with a straight-on shot to emphasize the height of the stack, and decorated table settings are best photographed with an overhead shot. Although a close-up shot is usually your best bet, sometimes it’s better to pull the camera back and have your food pop out instead of filling up the entire shot. When it comes to cropping, either display the food in its entirety or crop only one side of it. Cropping multiple sides of the food produces a choppy image.
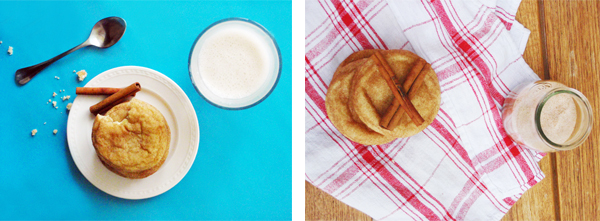
Stage your food. Using props like utensils, napkins, extra garnishes (like fresh herbs), and ingredients can help fill that negative space in your photos and bring out the colors of your food. Not sure how to arrange everything on the table? Meet the rule of thirds, which tells you how to use those gridlines on your camera screen.
Choose the right serving dish and employ variety. The rule of thumb with serving dishes is to go with smaller dishes to prevent them from looking bare, and, use white dishes because they are simple and clean-looking. White serving dishes may be the safest option, but they can also be boring. Check out Ikea and Target for colorful and patterned serving dishes at affordable prices. For vintage serving dishes, check out garage sales and resale stores. You can even try using old oven baking tins, wood cutting boards or a crumbled up brown bag for shabby-chic effects.
Clean background. No matter how you stage your food, make sure you arrange it in front of a simple, clean backdrop. Lay a piece of fabric, wrapping paper, tablecloth, bed sheet or shower curtain on the table and prop it up with a box.
Use the dirty little secret. Alright, I’m just going to come out and say it. Almost every food photographer out there edits their photos in Photoshop (or a similar program). It is our best friend when it comes to touching up the cropping, color levels, contrast, and sharpening elements of a photo. You can get good student discounts on Photoshop while you’re in college, or you can download free photo editing programs like GIMP and Picasa.
Learn from the pros, and practice! Get inspiration for your food photos from cookbooks, foodgawker, FoodPornDaily, and your favorite food bloggers and pin them to a pinboard. Mimic what they do best and practice, practice, practice.
Brynn Cahalan is a Business Economics major and Digital Arts minor at UC Irvine. Although the usual subjects of her digital arts projects are humans, she has come to realize that many of the same principles can be applied to food photography. Read more…
Originally posted on Tuesday, May 15th, 2012


Subscribe to our weekly newsletter!
The BGSK Book


6 Responses to “How To: Photograph Food without a Fancy Camera”
May 15th, 2012
Excellent tips for everybody, regardless of what kind of camera they own. Wish I knew this stuff when I was a photography minor in design school!
May 15th, 2012
Fantastic and so helpful!
May 16th, 2012
Those cookies look like they turned out pretty well, bet they tasted good!
May 18th, 2012
[...] culminating in a relaxing Mother’s Day. Earlier in the week I received a delivery of homemade White Chocolate-Stuffed Snickerdoodles from my thoughtful and clever daughter. She accomplished a twofer on this one; the cookies became [...]
May 18th, 2012
This is a wonderfully informative post. You have condensed all the material people pay big bucks for to attend food photography classes. Thank you!
May 20th, 2012
Brilliant! While I’m sure one day I will have a fancy camera for now I don’t so also rely on my little point and shoot. “Read your cameras manual” was like a slap in the face moment, so obvious but I haven’t looked at it since that quick glance when I got the camera, Im digging it out now! This is so helpful, thank you!
Leave a Reply